Sunday, December 14, 2014

Holiday Greetings!

One of my favorite parts of the holiday season is sending and receiving Christmas cards. I love seeing how the children of my friends and family are growing. And I love to have happy mail arrive. Years ago, when the kids were little, I would assemble the best photos from throughout the year and make simple black and white photo-copied newsletters with some hand written notes. These were a favorite among friends and family across the miles. In fact, if one family member received one a day or two before another family member in the same town, they would complain that I had forgotten them. Of course, I never did, it was just a delay in the postal system. 

Now, in the day of Facebook, and with my kids grown, there is less need to recap the year, but I still love to send cards. Knowing I can brighten someone's day from miles away is why I love sending cards, now and throughout the year. And without the need for the "newsletter", I can focus on making handmade, beautiful cards to send. This year's mailing list includes more than 70 friends and family. 

I've been working since October to design and create cards for Christmas. 

Several of them were part of my Crankin' Out Christmas class series for the fall. 


I also had a few leftover from last year (really hoping I don't send the same design to someone two years in a row). 


And Paper Pumpkin helped round out the designs for the year. 


With the card making finished, it was time to start addressing and mailing the cards. This includes an annual call for updated addresses for those who moved during the year. People still look forward to receiving a handmade card, so folks quickly let  me know their new address. Of course, it takes a few days to get the cards all written and addressed. My favorite time to do that is on Sunday afternoons, while watching football. 


I hope if you receive one of these in the mail, they brighten your day just a little.

Now, with all of our greeting on our way it's time to kick back, relax, and enjoy the holidays. Maybe I will join our elf in a little knitting break. 


I'm so excited to add string classes in the new year. 

Merry Christmas and a very happy new year to you! 

Sunday, October 12, 2014

Tricks and Treats!

This month's stamp class focused on creating the cutest little packages for our Halloween treats. 


First, I used the September Paper Pumpkin kit to make these adorable burlap bags filled with chocolate. The kit has everything you need to make the tags and decorate the bags for sharing with the ghosts and goblins in your neighborhood. 


Next I used the Envelope Punch Board to make this little pouch. Start with a 5" square of paper. Line the first edge at the 2" mark, pouch and score. Rotate the paper, line up at the 3" mark, punch and score. Rotate and line up at 2", punch and score. Rotate to final side, line up at 3" and punch, but do not score. This will be the top flap that doesn't fold. Use the corner rounder to round all corners and assemble the pouch. I used the Frightful Wreath stamp set for the tag. 


This little broom uses the Holiday Invitation stamp set on the tag. Just use Stampin' Write markers to color and stamp on word of the greeting at a time. 


Finally, This little tag is my favorite. Use a 1.5" circle as a mask and sponge black ink on the tag to make the sky. Add a free-hand cut grassy knoll. Stamp the tree and bats, add the house using Stampin' Dimensionals to add depth, with a fussy cut ghost adhered to the backside of the roof. 

Happy Haunting and I hope you have the sweetest treats on the block!

Tuesday, October 7, 2014

August Paper Pumpkin


August? Yes it's true, I'm just now getting around to posting some of the great projects I was able to create with my Paper Pumpkin mailing. 

I have an excuse! 

It could be that I was just too busy enjoying the beautiful and unusually mild weather we had that month and just now opened the kit to play. But honestly, it's not that at all. I simply forgot! I had so much fun crafting and taking photos, then I promptly forgot to post them. As I was cleaning out my photo album today I came across them and realized my mistake. 

Well I'm catching up today, and I will share some picks of my September kit as well. 

First off, I want to make sure you know what Paper Pumpkin is. It's a lovely little creative getaway mailed directly to your door every month. The kits are usually shipped on the 10th of each month. I'm excited that we are only a few days away from the October kit hitting my doorstep, I can't wait to see what goodies come this month. The kits include everything you need to make the project...precut pieces, stamps, ink, and embellishments. You can craft the items in the kit as instructed in the little booklet that comes with the kit in about 30 minutes. Or, you can let your creativity run wild and mix things up any way you please. It is a great way to build your stamp and ink collection, as well as escape for a little time each month to create without any of the prep work.

And I offer a monthly class for any Paper Pumpkin subscribers. Bring your kit and we will assemble it together. I will also share some ideas on how to "step it up" just a bit and really personalize your creation. You can find out more about my Paper Pumpkin class and any other classes I offer, as well as RSVP for them, through my calendar at www.clothpaperstring.stampinup.net.

So here is a phot of the cards I made following the kit instructions. 


I love the die-cut greetings and the little sequin embellishments really make it sparkle. I also love the industrial look of the envelopes with their string wrapped ties. There was just so much to work with when I started to play with my own designs. 


First I split the prefolded card base into two, so that it was like a postcard, and added a trimmed die-cut. I trimmed the envelope into a pouch by removing about a third, cutting off the top flap. I used the flap to create a pull tag that is used to slide the card in and out of the pouch. Finally, I stamped a sentiment and attached it, with some twine, to the pouch. This style would also make a cute interactive journaling box for a scrapbook page. 


I turned one of the small envelopes into a gift card holder. I scored about 1/8th inch all the way around the pre cut, but un assembled envelope. Then I folded and assembled along the new score lines. I added a band using the scrap from the card base I deconstructed for the last project, added a star and a greeting, and voila! A gift card pouch.

Now here are the projects made with the September kit. I've already used them in a Tricks and Treat Bags class. I've given a couple as hostess gifts. Super easy and so fun to share. 


Oh, all this remembering August and September make me doubly excited about the October shipment that will hit my doorstep in a few weeks. There is still time to sign up for your own kit (sign up here at https://mypaperpumkin.com/?demoid=2128639) before they ship on the 10th. If you need a little more time to decide, they ship every month. I'm sure November will be awesome. I will be sure to share them. And I will try hard to be more timely. 


Thursday, August 28, 2014

Who doesn't love birthdays?

Happy birthday! Dreaded words? Or do you appreciate the heartfelt wish, because for one day everyone celebrates you and reminds you that they are happy that you are in their life?

Even though the years are flying by faster than seems possible, I still love to celebrate my birthday. And I especially enjoy reminding my family and friends how much I love and celebrate them on their birthdays. And what better way to do that with a handmade card! Sending a card with a happy thought to let someone know how much we appreciate them is something we just don't do enough of these days. But I know how excited I get when there is a piece of mail that isn't a bill, or credit card offer, or some other item addressed to "resident". It's even better when it's a card shaped piece addressed just to me!

I know you feel the same way when someone takes the time to actually send you a card to celebrate a special occasion, right? So why not make someone's day and make a commitment to send more birthday cards. The Amazing Birthdays stamp set makes it easy to make your own handstamped greetings.  


This lovely little set has so many possibilities. You can make something quick (or a dozen to have on hand or give as a gift). 
 

Or you can design something really special tailored just for your special loved one.
 

You can also use the designs to create party favors treat bags, gift tags, and party decor.  


So many uses, so easy to get carried away with. 
 

Why not make and send a card today?

Who knows what it will lead to...happy friends, reconnecting with distant family, maybe even a card in return. You can find Amazing Birthdays at www.clothpaperstring.stampinup.net.

Tuesday, August 12, 2014

Back to School!


I can't believe that it is already time to go back to school! This summer has breezed by, and it seems I have been focused on back to school since before school let out, so I feel a little like I missed it all together.  

Of all the preparations, the kids are most excited about learning who their new teachers will be. And of all the jobs out there, teachers have the toughest and most important. Welcoming them back to a brand new year is a treat I enjoy giving them, a little thanks in advance for all that is ahead. 

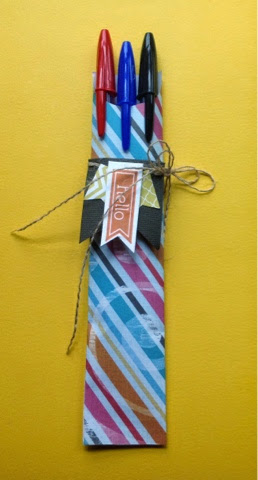
My kids are older and at the age where they have not one, but many teachers during the week, so welcome back gifts have to be small, portable, and affordable. This year I decided to send in some pens - you can never have enough, right?  

But they couldn't be plain pens. They needed a little pizazz. I found inspiration on Pinterest (where else?), and adapted a post by stampedblessings.com.  


I started with a 6 x 3 1/2 inch piece of decorative paper. 


Score it along the long edge at 1 1/2" and 3". Use a circle punch to make a half circle cut at the top of the middle section. 


Apply adhesive along the right side of the 1/2 inch flap and bottom edge. And fold the left 1 1/2" section to meet the edge of the folded 1/2 inch section and seal. The pouch is finished and ready for decoration. Here are my pouches with their decorations. 


Here they are all together. My kids can't wait to share these treats with their teachers.


I hope everyone has a great back to school season.


Monday, July 28, 2014

Inspire. Create. Share.

I had the wonderful opportunity to attend the Stampin'Up! national convention for the first time. What an experience! Imagine spending three days with amazing, creative people, all focused on making pretty things and supporting each other to excel at their craft and business. 


Although there was a pre-party Wednesday night, Mother Nature and the airlines worked hard to make sure I did not arrive until Thursday. But I am an intrepid traveler and was going to get to Salt Lake no matter what. When I touched down, I raced to drop off my bag, meet my roommates (who started as complete strangers, but are now friends) and tried to catch up on some of the excitement. My first activity was a tour of the home office. 


Wow! What a wonderful place, and I imagine lots of creative people have a really good time coming up with our wonderful products and ways for us to grow and sustain our business. The innovation room and warehouse were pretty impressive, I especially loved the floor to ceiling white board for sketching out ideas and plans, and the giant bean bags. I can't tell you how many times I want to curl up on a nice comfy seat with my laptop and just dig into a focused writing or analytical task during the work day. I know I would be more productive that way.

But the real fun came when we walked through the staff office area and were able to see the everyday creativity that goes on. Of course they had some lovely samples on display for us to view as we walked through, but I especially appreciated the little cards, notes, and banners that were pinned in special places in individual work spaces. This really showed me that they value each other and our craft enough to make and give handmade cards in real life, not just on the pages of a catalog. 

That was pretty much the extent of my first day. But more fun to come over the next three days. The educational sessions were exactly what I needed to gain the confidence using new products and sharing innovative techniques with my stamping friends. There were so many great ideas and hundreds of samples, I can't even begin to share all of the photos I took. But here are a couple of my favorites.


Swapping samples with fellow demonstrators is serious business at the convention. I wasn't savvy enough to join in this year (next time for sure) but I did get to see many of the wonderful creations my roommates made and collected. 


And there were several make and takes and a product playground where we could try out some of the new items and techniques.  We got an exclusive sneak peek at the holiday catalog...so many fun things I can't wait to try out. I'm looking forward to crafting my Christmas cards and tags this year. 


Oh, and always fun -- prizes and giveaways! I had so many goodies, I seriously don't know how I managed to get my clothes home. Below is a photo of my suitcase. That little square at the top was all the room I had left to cram three changes of clothes, but I did it!


Now I'm back home and putting all the great ideas into practice. I came away inspired to create and share everything I've learned. The convention lived up to its name 100%!

Wednesday, June 18, 2014

Paper Pumpkin - a craft party delivered right to your door!

Are you a crafter at heart, but don't have the time, space, or tons of supplies? Well Paper Pumpkin is for you! Paper Pumpkin is a monthly subscription service from Stampin' Up! For only $19.95 per month you will receive a kit in the mail each month that includes everything you need to have a 30 minute creative escape.

Kits include stamps, ink spots, paper and instructions every month. You may need scissors and adhesive (not included) to complete some kits. You can make the project designed, or you can use the supplies to create your own projects and designs. Plus you can build a great collection of stamps and ink that are exclusive to Paper Pumpkin!


And nowStampin' Up! offers pre-paid subscriptions in 1, 3, 6, & 12 month increments. These make great gifts and 6 and 12 month subscriptions offer a sweet discount. And if you subscribe online through my Paper Pumpkin site Join Now! and choose a 3 or 6 month subscription, I will send you a case to store your inks and stamps in as a free gift. If you choose a 12 month subscription, I will send you a case, as well as adhesive and scissors, so you will have everything you need in one place.
 

Monday, June 2, 2014

It's here!

Yay, the new Stampin' Up! Catalog is live! I've been drooling over all of the awesome new products for a few weeks now and I can't wait to share them. 


Take a look at clothpaperstring.stampinup.net and find your new favorites and must have products. 

Tuesday, May 27, 2014

The Land of Enchantment

Now and then, my day job requires travel. Sometimes planned well in advance, and sometimes with just a moments notice. And always to exotic locales like Detroit in Februaury, or Kansas City in July, or similar such nonsense. Well last week, with three days notice, I had the wonderful pleasure of returning to New Mexico for the first time since my family left that state in 2001. 

Ok, so I wasn't thrilled. 

We lived in New Mexico for about 18 months back in 2000-2001 while my husband attended flight school. I like to joke about knowing the exact number of days and hours, but honestly, time has softened and blurred those memories. Let's just say I haven't had it on my list of places I'd like to go. But duty called and off I went. 

I tried from the onset to look at the bright side of it all. The first upside was the fact that there were no direct flights from DC to Santa Fe. That is saying a lot because making a connecting flight is never an upside, right?  And especially not a grueling, lengthy layover. But this one happened to be in Los Angeles, where my oldest daughter lives. She was off work so she picked me up for lunch! We enjoyed In-N-Out burgers, and we ran to a craft store (I forgot to pack size 6 dpns and needed them for the next flight). We wrapped up our quick visit with a stroll on the Manhattan Beach pier. 


That indeed was a lovely surprise for this trip I didn't want to take, but there was more in store. 

I arrived safe and sound and the next morning took a lovely run on a trail just a couple blocks from my hotel. My body quickly reminded me that altitude matters, but the sunrise and mountain scenery, along with the adorable scampering bunnies, made it such a pleasant way to start the day, I made sure to try again the next morning. 


After a busy morning on the phone for east coast meetings, but before my Santa Fe meetings started, I set out for a quick bite and a little exploring. When I travel, whether for work or fun, I always scout out local yarn shops. I found one not far from my hotel and the name alone sealed the deal, I wasn't missing this one. 


This little gem is nestled on the back side of a building and if you blink you might miss it. 


I popped in and enjoyed a cup of coffee, some shopping, a little knitting, and the wonderful company of Rissah, the very nice and helpful woman working that morning. They have a wonderful variety, including some beautiful local and regional yarns. 


I found just the yarn I needed for a knit along I had joined (must finish Ginny's Cardigan #2!). 


So far day 2 of this trip was off to a fabulous start! The meetings went off without a hitch, and I ended the day with some authentic Mexican food. The next day, after a better run, and another full day of meetings, someone mentioned a bakery I should try on my way out of town. Boy was I in for a surprise! 


Revolution Bakery is a 100% gluten free bakery and cafe. I went in expecting cookies and such but was thrilled to find REAL BREAD! While having a food allergy is no fun, avoiding gluten is fairly easy. But good bread is really hard to find. I ordered two loaves (and carried them carefully home on the plane), a pizza (which was like every other pizza I get, I wish I had ordered the grilled cheese), a cinnamon roll for breakfast before my 6 am flight, and a sugar cookie. I may just plan a regular trip to Santa Fe to stock up on bread and sugar cookies. And I will definitely have to try the pancakes next time. 


And since the two surprise locales on my trip are so close together, I will grab some Yarn and Coffee while I'm in town.  All in all, I am glad I had the opportunity to take this trip.  So many surprises and good memories.