Friday, February 8, 2019

Create. Connect. Inspire.

When I launched the Cloth Paper String studio I had two primary objectives; to foster creativity and facilitate connections. 

First, I want to encourage women to tap into their intrinsic desire to create beauty around them. I believe we were designed to create and be creative. Too often that creativity is pushed aside and left to wither. Maybe we are too busy. Maybe we have tried various projects in the past, but they didn’t turn out (hello Pinterest fail!). Maybe we want to take up a new hobby but we don’t know where to start and get overwhelmed with options. Maybe our budgets or living spaces are tight and we can’t invest in tons of supplies that take up a lot of space (but does it bring you joy?).

It hurts my heart when people say “I’m not creative.” It’s just not true. Everyone is creative and can benefit from spending time pursuing and strengthening that part of themselves. There has been so much research recently describing the mental and physical benefits of engaging in the creative arts. Just like physical activity, eating and sleeping well, and spiritual health play a role in your well-being, so can creative hobbies.

Cloth, Paper, String can help with all of these aspects. In the studio, there is space for women to gather and create. I stay up to date with crafting trends, I have decades of crafting experience in many mediums and am constantly learning new skills, the studio is well stocked with tools, and I have a worldwide network of other crafters to draw advice and inspiration from. And I offer all of this to you! In the studio or online, the Cloth, Paper, String community is here to help you be successful in your crafting adventures. 

But making pretty things is only part of the purpose of Cloth, Paper, String. We live in a very busy world. We can fill our calendars in an instant and fall exhausted into our bed each night, but still find ourselves disconnected from others, with only superficial interactions. 

Cloth, Paper, String is building a community of crafters. Here in Northern Virginia, and online. I want people to meet each other, get to know one another. When we are crafting together we talk and laugh. We talk about our joys and our frustrations. We see that others are carrying similar loads, and we learn that we are not alone in our day to day experiences. I’m always amazed at the connections and commonalities that we discover every single time a new crafter comes to the studio. If you think about the quilting circle or barn raising tradition, the simple act of creative activities in a group can have deep impacts that are not at all related to the finished product. Opening a space for these connections to happen is the most important part of Cloth, Paper, String to me. Even more than helping you craft something pretty to give, or wear, or hang on the wall, I want to help you to create connections to others.

Finally, I hope that our community of crafters can inspire others to step into the creative arts.To try new things and have fun. If they see something one of our crafters made, maybe they will give it a try and unleash a talent or enjoyable pastime they didn’t know they were missing.

So there it is, the Cloth, Paper, String motto: Create, Connect, and Inspire. I invite you to join us on this journey.


Friday, February 1, 2019

Rainy Day Crafting

Spring time means rainy days. And when the storms roll through, it’s nice to have a craft studio conveniently located in the basement! This time of year, if I’m not working in the garden you can find me creating in the studio. And some studio creations include flowers!


This lovely paper shadow box looks fancy and complicated, but it’s really quite easy. I found the original concept and fold instructions here.

Here is a quick diagram to help you understand how the page is scored and cut.


It’s made with a 12x12 sheet of cardstock. Our new Share What You Love suite and Designer Series Paper works beautifully for this.

Thursday, January 31, 2019

You Are Wonderful

You are wonderful and so is this little card. 


This card is cased from a make and take I got at the April 2018 On Stage event, re-imagined for September’s Stamp and Sip. I’ve used the Rooted in Nature suite, but this design could be used with any number of images. 
The card is fairly easy to assemble once you have all the pieces cut and stamped. 
A tip on those leaves tucked behind the greeting. The original image is not quite large enough to peek out from the greeting and banner, so I snipped them in half and stretched them to fit. It’s ok, because the banner hides the gap. 


What’s Onstage? Only a twice a year, global crafting party with hundreds or thousands of crafters just like you! You can learn more here. Want to come along next time? Contact me by messenger or email for all the details.

Wednesday, January 30, 2019

Big Box vs Cloth, Paper, String

During the government shutdown, I had an abundance of free time, and did not have a long commute each day. I did all the crafts, but after a few weeks, I needed to get out of the house. Helpfully, Facebook suggested a DIY event st a local big box hardware store. My kids used to go to the Make and take workshops there when they were little, so I signed up and eagerly waited for the day to come.

I had a great time at the workshop, but noticed a few things that were similar to the workshops I offer in the Cloth, Paper, String studio, and a couple things that were very different. So I wanted to share them with you.

First, the things were the same:

1) The staff hosting the event worked hard to put together a good project. It turns out that the corporate planned project was actually kind of lame. The local staff tasked with presenting the workshop knew that the people coming to the workshop would want something better. So the staff scrapped the lesson plan and instead prepared three real life options at different price points and technical difficulties to demonstrate. In the Cloth, Paper, String studio, I work hard to plan projects that I think our community of crafters will like and that teach fun new techniques. Every workshop takes hours of project planning, design, and preparation. And I love every minute of it, because I know I will soon be sharing it with you!


2) The instructors were really eager to share their knowledge and skills. It was snowing on the night of the workshop. When I walked in, the instructors were so welcoming and happy that I was there. Between the two of them, they had so much knowledge about the tools and supplies. They answered all of my questions about the project, and also answered some questions about other projects I had underway at home. I also love to help people have successful crafting experiences. I have decades of personal knowledge and experience in many crafting mediums, but I also have access to a worldwide network of professional crafters to draw on when I don’t know the answer to your questions.

3) Small classes mean personal attention. I mentioned the snow. In the DMV, snow means all activity stops. However, as a Montana girl at heart, I was not deterred by the snow. The other seven people that signed up were not so brave. I was the only student! And we had a great time anyway. it was also reassuring to learn that even with all their corporate resources, advertising budget, and reputation plus being located in our very populous suburb, they attracted only eight attendees to this workshop. My biggest event was 12 students, but we most often have between one and four people. This means I am able to give personal attention to each person and ensure that they master the techniques and successfully create their project.


Now for the differences:

1) The workshop is not designed to be a hands on workshop.  The advertisement for the “DIY” workshop was a little misleading. The instructors ask for volunteers to help with various stages of the demonstration, but for the most part, it is just that, a demonstration. In the Cloth, Paper, String studio you do ALL of the crafting (though I have been known to tie a bow here and there). I prepare projects and instruction to teach you new skills and techniques that you can use in the studio and at home.

2) You do not leave with a finished project. The instructors demonstrate building one project, and at the end of class, they often give the finished project to one of the attendees as a prize. The advertisement suggested that I could purchase the supplies and build my own project, which I could do, but I couldn’t build it at the workshop. Because I was the only student in the workshop, I was luck to both build the whole project, I also got to take it home, so it turned out great. But it would have been a completely different experience if the other registrants had shown up. When you come to a Cloth, Paper, String workshop, you will have the supplies to do the project advertised, and you will take it home when the workshop is over. Every. Single. Time!


3) You have to buy all the tools and supplies to make the project at home. Normally, if I wanted to actually build the project demonstrated at the workshop, I would not only have to buy the wood and hardware, but I would also have to have the saws, hammers, and screwdrivers on hand. All to make the project I thought I was going to make at the workshop. However, when you craft in the Cloth, Paper, String studio, I have all the tools! (my husband is nodding in agreement) In my workshops you use my supplies to create your projects. No need to amass huge collections of tools and supplies. But if you already have a craft room and want to build your collection, or learn how to use what you already have, I can help with that to.

All in all, I had a wonderful experience at the big box DIY workshop. I left with a great whiteboard that helps,me stay organized during my studio work sessions. And I also left with more confidence and pride about what I offer in the Cloth, Paper, String studio. I want everyone who comes to craft in the studio to have a fun and successful creative experience, and I think most, if not all, would say they do just that. If you’re in Northern Virginia, I hope you will join us in the studio and see for yourself.

Wednesday, January 9, 2019

Blocking Your Hand Knitted Treasures

Whether you’ve just finished your first hand knit project, or you are hand washing that great sweater you bought last season, “blocking” your knitted item while it dries will help it maintain the intended shape and fit. 

Blocking can seem intimidating, but it’s quite easy. 

Here is what you need:

  • good quality hand wash detergent 
  • T-Pins (optional, but very helpful)
  • A large towel 
  • Foam core poster board (this is optional), or blocking mats if you're fancy

First, carefully hand wash your knit item. Use cool water and minimal detergent. 


Rinse thoroughly and gently squeeze out as much water as you possibly can. 


Then spread out your item flat on the towel in the general shape you want it to be. 

Now roll up the towel and knit item together, like a jelly roll cake. 


Now this part is fun. You need to press out the water. I like to step and walk on the rolled up towel to squeeze out more water. You can do this a couple of times with more dry towels if you are having difficulty getting the water out. 


Now that your item is just damp. Unroll the towel. You can swap out for a dry towel if yours is too wet. 

Carefully lay out your knit item in the desired shape. Be sure to flatten any edges that might be rolling up. Using pins to hold various edges in place can help. 


Then just let it dry! Sometimes, I will flip the item over after the top has dried and re-set the pins to make sure both sides are the right shape and lay correctly. 

Once the item is completely dry, it is ready to wear or share. 


If you love this vest, you can make it to. The Bamboo Shell pattern is available from Purl Soho here


Tuesday, November 6, 2018

Rooted in Nature - Thinking of You


Here is another card using the Rooted in Nature Stamps. 


I used the tree stamps on a very vanilla mat to make my own forest back ground. Then I used the framelit and a small scrap of very vanilla to cut a single tree. 

The Z-fold of this card is simple to make. Just score your 5 1/2” x 8 1/2” base at 4 1/4” and score again at 2 1/8”.


Fold the 4  1/4” line to make the card middle or spine. Then fold the 2 1/8” score back toward the spine. This makes the Z. 


Then you just adhere your card front to the half front of the base. It’s easiest to apply your adhesive to the card base and set your mat down on it then trying to guess where to stop applying adhesive on the mat. 


Assemble the rest of the card as shown and voila! Give it a try, and let me know how it goes. 

Thursday, October 11, 2018

Rooted in Nature - Beautiful Oak

I love the tree image in the Rooted in Nature stamp set. It reminds me of a tree I used to drive past often when we lived in New Mexico. 


That tree was just there by itself, in all of it’s gorgeousness, in the middle of nowhere. It seemed so persistent, and strong, and present. I loved the tree so much, that I stopped on the highway one day before we moved away from New Mexico to snap a photo. 


What a  perfect image for a card you might need for a friend going through a hard time. 

This card is very simple to put together. 

I used a 5 1/2” x 8 1/2” Early Espresso card base scored at 4 1/4”. I embossed the front of the card by loading only the front side into the embossing folder, then ran it through the Big Shot. 
I stamped the tree image on a piece of very vanilla, then carefully tore the edge (tearing toward myself) to make a ragged edge. I wrapped a piece of ribbon around the bottom edge and secured it with a glue dot. I added an embossed leaf in Crushed Curry and adhered the whole bundle to the front of the card. I added a greeting to a very vanilla mat and adhered to the inside. 


So simple, yet so beautiful.

Monday, October 1, 2018

What’s Up In October?


October is my favorite month of the year! I love fall foliage, costumes and candy, and my birthday is in October! October is also the month I created Cloth, Paper, String! This year, I will be celebrating five wonderful years of building this creative community. 

Since October is so great, I have a plan to celebrate all month long, and I hope you will join us. 

What would any great birthday celebration require? Probably games, presents, good memories, maybe some crafts, and of course, cake!

Follow along on Instagram, Facebook, and here. Join in the fun by adding photos or comments  on the post, and I will be giving away prizes all month long. Prizes will include handmade cards that you can use to send to the people you love, and of course, free craft supplies. 

On Mondays, your challenge will be to #makeacardsendacard (#MACSAC). Each week, I will have a theme, announced on Facebook live, challenging you to send a card to someone. All you have to do is make the card (or use a handmade card from your stash), mail it, and post a photo in the comments of that week’s Monday #MACSAC post. Be sure to post your photo of the card front, or even the stack of cards in your mailbox by Sunday of each week. 

On Tuesdays, I will be encouraging you to try a new craft or technique. By the end of the week share how it went in a comment on that Tuesday post. 

Wednesday’s are game night! I will post a quiz or question. Just add your answer to the comments and I will choose a winner on Thursday morning. 

Thursday’s are for memories, #TBT. I will be sharing a few of my favorite Cloth, Paper, String memories, and would love to hear some of your memories along the way. 

Friday’s are fun-days. Each Friday, I will post a new creative challenge for the weekend. Complete the challenge by Sunday evening, and tell us about it, or post a photo in the comments to the Friday challenge post. 

Every Saturday, I will post a Saturday Special. Now I post Stampin’ Up! specials when they are abounded. But these Saturday offers are discounts or deals, just for you. 

Finally, Sunday’s will be our Prize Patrol. This is the day when I tally up all of the challenge results and comments, and draw the winners. Most prizes will be mailed by the following week, though some will be mailed by November 1. 

Are you ready to party all month long? I am! And I’m excited to have you help me celebrate five years this amazing Cloth, Paper, String adventure. 

Friday, April 27, 2018

It’s a Jungle Out There Kids!

Yesterday was Take Our Daughters and Sons to Work Day! This is a great day because there are a lot of adorable, fresh faces at the office, and the kiddos are learning about the real world of work. I always enjoyed bringing my kids to the office to help them understand what it is I really do in my day job. I do “policy”. This is really hard for people, even adults, to grasp what I really do. It’s not like being a pilot, or a police officer, or a waitress.  It isn’t implicitly understood what my function or output is. But I think what I do is very interesting and fun and important. Coming to the office gave the kids context for what my job is, and helped them appreciate how and where I spent my days.

Of course my kids are grown now, so I miss binging them in for the day. But that doesn’t mean I can’t enjoy when my colleagues children come to the office. In fact I was very excited to learn that a colleague was bringing her two young boys to a meeting early in the morning. To make sure they had a productive day, I made them padfolios and business cards to help them get through the rest of the day.


These are super simple to replicate. I used a 8” x 10 1/4” piece of cardstock scored at 5” and 5 1/4”. I glued that to a small note pad to make the cover. Then I made a 5 1/2” x 4 1/4” Night of Navy mat. I stamped and used watercolor pencils and a blender pen to color the Animal Outing* stamp set  images on a 5 1/4” x 4” whisper white base.


I used a 5” x 5” square retired DSP and the envelope punch board to make the inside pocket that held the printed business cards. Assembly was quick and easy. Coupled with some crayons and the boys made it through at least one meeting taking “notes”.

*The Animal Outing stamp set is in the new Stampin’ Up! Catalog, and available starting in June. Sign up for my mailing list if you would like a new catalog when it’s available.

Wednesday, April 11, 2018

On Stage!

I’ve just come home from one of my favorite weekends of the year, On Stage!

On Stage is a twice a year creative refuel from Stampin’ Up! It is chock full of fun, crafting, and creative inspiration. Of course we do some business related work as well, but fun is the main event.


This past weekend, I got an exclusive early look at the new 2018-2019 Stampin’ Up! Catalog (Want one? Request one here). I got to try out some of the beautiful and innovative new paper crafting products headed our way. And I get to pre-order some of those products and will get to play with them for weeks before anyone else.


I met new friends and reconnected with long time friends. I learned new techniques and have a notebook full of ideas to share with you.


And I got spoiled. Seriously. Spoiled, with a capital S! So many treats and freebies. I can’t decide which are my favorites.

So stay tuned.  I’m going to be sharing so much of the On Stage awesomeness over the next few weeks, and months. And I’m planning to run out of ideas by the fall, just in time for the next On Stage (which BTW is the big 30th anniversary party for Stampin’ Up!).

Does attending On Stage sound like fun? Why don’t you join me in November? Contact me for all the details.

Wednesday, January 10, 2018

The Red Box Challenge!

If you’ve been following along, you already know that I love Paper Pumpkin. A beautiful and practical creative retreat delivered right to my door every month, for under $20. It’s awesome. But I will admit, sometimes the boxes don’t get emptied right away. I might do the greeting cards, but skip  the small gift enclosures or tags. I might need all of the projects for a holiday gift idea, or I might only use half of them. Of course the projects are just too pretty to get discarded. So they wait. In a neat stack. 

Because life happens, and we can let those boxes linger on long, Stampin’ Up! Has issued a challenge. We are challenged to open one of those red boxes in the pile and make an alternative project. That means make something different than the project the kit was designed for. This might mean turning a card base into a giftable treat, turning those embellishments into a great scrapbook page, or whatever your imagination sees in that little red box of supplies.  Once you’ve created your masterpiece, share it on Facebook or Instagram with the hashtag (so its searchable) #redboxchallenge and you might become internet famous!!! 

Well ok, you might become Paper Pumpkin internet famous. Your project could be featured online by Stampin’ Up! And you might win the March Anniversary Paper Pumpkin FREE! 


So here is my Red Box Challenge project. I looove, love, love donuts. But the May 2017 kit had nine donut cards. I didn’t need nine donut cards. Now, this girl can eat nine donuts from Krispy Kreme without a second thought, but that’s neither here nor there. So I made a “mermaid” card instead. What do you think? 

Want in? Join Paper Pumpkin now.

Want to join the challenge? Here are the rules and fine print!


Thursday, January 4, 2018

Snips, Snail, and a Bone Folder “Tail”

If you’ve been to the Cloth, Paper, String studio, you know that I have lots of tools and supplies to help you achieve your perfect crafting goals. I really enjoy sharing these tools and sharing in the fun of crafting all the things. But I’ve decided to make a slight change starting with this month’s paper crafting workshops.

In my cloth and string events, people are given a list of supplies that they need to bring to class. Now, for paper classes, I will ask crafters to bring their own paper crafting basic tool kit along to workshops. What is a paper crafting basic tool kits you ask (besides a mouthful)? Well it’s pretty simple, actually, and you probably already have the three most important pieces laying around your house. Of course it can also be pretty extravagant if you like, but I’m going to focus on three core items - scissors, adhesive, and a bone folder. Here are my favorites for paper crafting:

First, you need good scissors. And yes, they need to be used only for paper. I love the Stampin' Up! snips because they have a perfectly pointed end that allows for smooth fussy cuts around those stamped designs.


Second, you need a steady stream of adhesive to craft with paper. Now there are many kinds of adhesives, each with it's own special use. But most commonly you just need to adhere paper to paper and the Stampin' Up! Snail Adhesive is perfect. Plus, I always keep a stock of refills on hand if you run out during class. If there is a specialty adhesive needed for a workshop project, I will provide it. But over time, your adhesive collection will likely grow.


The last key paper crafting tool to bring along to class is a bone folder. It makes for sharp creases and flat folds. You can use your fingernail, but that gets tough after a few folds. Again, I love the Stampin' Up! bone folder. Especially the personalized* one gifted to me by a sweet friend this year. 


* Personalization was done after purchase by a third party and is (unfortunately) not available through Stampin' Up!


While I obviously prefer the Stampin' Up! versions, you are free to bring whatever your favorites are to class. But if you need a kit, you can get all three of these for just $24, when ordered directly from me. It can take a couple weeks for items to arrive, so plan ahead for your future workshop attendance. 


I can't wait to see you at the next workshop! And don't forget your kit. 


Tuesday, January 2, 2018

Happy 2018!

Whether you are celebrating or mourning the passage of 2017, A brand new year is an exciting time!  I love the blank slate of it, all of the potential ready to be appreciated. Are you ready for 2018? I am so ready.

We don’t make resolutions in our house, we set goals. One big goal in our family in 2018 will be the remodel of our kitchen, more on that later. I always have travel goals, and I’ve set a fitness goal of running a 5k in less than 30 minutes this year. The kiddos have their own goals related to school and such. And of course I have big goals for Cloth, Paper, String! 

With all these goals, it’s important to take some time to get organized and get your plan together. I’ve been busy with a lot of planning over the last couple weeks. For example, with our kitchen, we’ve spent years fantasizing about what we would like to change.  But after a series of issues with our current kitchen, we finally had to focus on reality. We needed a plan - what needed to happen, in what order, and final decisions on what we could realistically do with our space and budget. The same decisions need to be made regarding our other goals...what is realistic, what steps are needed to get us there, what does the end result look like? 

Honestly, with my busy family, I need a plan everyday. That’s why I’m a big fan of planners. And I don’t mean an electronic calendar, that just doesn’t work for me. I need to visualize it, write it, erase it, feel it, in order for my plan to work. And yes, I love to do lists that I can cross off. I just love the blank slate of a new month or a new week in my planner. 


That’s why I was so excited when Stampin’ Up! introduced the Love Today Planner. It’s pretty, practical, and a great tool for keeping me on track with all of my plans. And since it is undated, you can start on any month.  Over the next few weeks, I’m going to share some of my favorite planning and organizing tips. I would also love to hear your tips and tricks to stay on task and achieve your goals!so be sure to follow along and comment here on the blog, and on Facebook or Instagram. 


Tuesday, May 16, 2017

A Special Graduation

My daughter is graduating from high school this year! One would think by child number three that I would have all of these emotions in check, but each one has their own little special reason for making this big event a new experience. 

Besides being my talented artist child, who can spend hours with me in the studio, we share a special bond over her years of scouting. I've been her troop leader since kindergarten, and the few girls who are still in our troop have been together for over ten years. They've had many wonderful adventures together over the years, from giant spiders, to skyscrapers, to meeting the First Lady, to a grand tour of Europe! And these amazing young ladies are launching into the world this year. I couldn't be more excited and proud of them, and weepy about the time that has passed. 

The moment I saw the tee-shirt builder suite in the Spring Occasions catalog, I knew instantly what I was going to make for the girls graduation cards. That sash just cries out for some Girl Scout badges!


So I tinkered around with some of the buttons, stripes and other bits of the stamp set to build it. 


Of course, since this was a special occasion, I wanted to make the card extra special. I had been seeing all the lovely mechanical cards so I decided to give it a try. I had photos of the girls through the years so I picked a few from our biggest adventures to put on the panels. I was quite pleased with the results. 


I also featured this card fold at my May Stamp and Sip, with a more general decor scheme. It also turned out quite lovely. 


Here are the instructions for the mechanical fold. 

Start with a base of cardstock cut 4 1/4" by 11" and score at 5 1/2". Don't fold it yet, it's easier to work with when its flat. 

For the four panel insert, cut a piece of cardstock 3 1/2" x 10" and score at 2 1/2", 5", and 7 1/2". 


Fold a valley, a peak, and a valley. Decorate with mats of 3 1/4" x 2 1/4" paper. My photos were 3 x 2. 

For the mechanical peice, cut a 8" x 3 1/2" peice of card. Carefully mark both long edges at 2 1/4" and 5 3/4". If this measurement is off even a little bit, your card won't fold correctly. 

Score down the length at 1 3/4", and score on the diagonal between each marking. 


Fold along the scores. Fold lengthwise, then fold the diagonals so that the lengthwise "peaks" are facing each other under a triangle. 


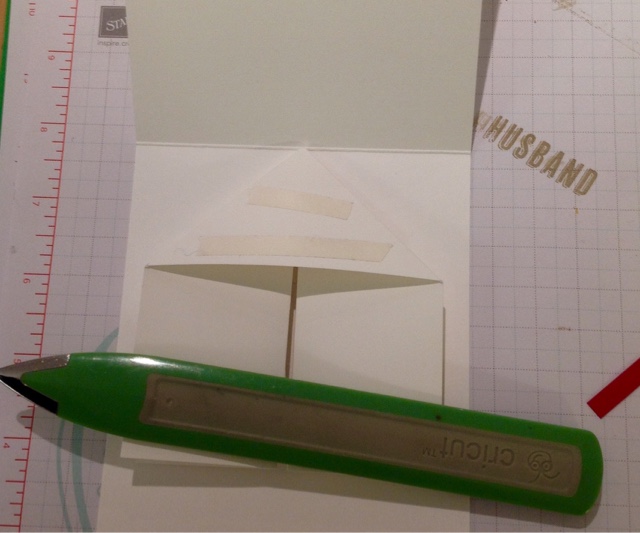
Add tear tape to the triangle and adhere one side right in the center and nudge the point of the triangle just up to the fold of the base. Then adhere the other side by adding the tear tape to the triangle and then folding the card front onto it. That way you know it will lay flat and is stuck to the correct spot. This is the mechanical peice that will make the four panel piece unfold when the card is opened. 

Now take your four panel peice and hold it open and upside right. Fold it closed (valley, peak, valley). You should now have a "book-like" set with blank covers. Take the left side closed four panel peice and slide it under the mechanical piece's left "peak" and adhere the two together. 


Then adhere the right side to the top of the right mechanical peice


The panel piece will be crossed between the two mechanical flaps. 


Decorate the front as desired. Make a slider band with a 10" x 2" piece of DSP folded to size around the card and adhered in the back. 

There you go! A real WOW card for someone special!


Celebrating Dad

Now that Mother's Day has passed we turn our attention to making sure Dad has his own special day. My kids are lucky in that their Dad can fix almost anything. From refurbishing classic cars to remodeling our entire home, the Dad in our family is always working on a project. That's why the Nailed It suite from Stampin' Up! is perfect for our Fathers Day cards. 

I was so excited to win this stamp set as a prize patrol at On Stage Local last fall. But I was super bummed when I went to order the matching framelits in May only to discover they were sold out! As in gone. Forever. I learned my lesson; when I plan classes around sets in our mini catalogs, order them right away, not just in time. And that's a good lesson for all of us; if we love it, get it!  

Aaannyy way, I put out a desperate plea to my sister demonstrators and someone nearby was able to loan them to me so our class could go on. I'm so glad, because look how great these cards turned out!


I love this one because I can replicate it without the framelits. 

And, fun tip, when making random background patterns like I've done here, just put all the stamps on one block and stamp once. 


Now, here is the card I really had in mind since I first saw (haha, get it, saw?) the set in November. 


It looks very complex, but it's a simple box card. Just take a 4 1/4" x 10 1/2" peice of red cardstock. Score on the long, horizontal at 2 3/4". Then score on the short, vertical at 1/2", 2 1/4", 5 1/4", and 7 1/4". Cut away to make a tab on the 1/2" section, and above the horizontal line between the 2 1/4" and 5 1/2" scores as shown in the photo. 


Fold on the score lines to form a box, and adhere the 1/2" tab to close. 

Cut two 4 1/4" x 1" pieces of red card stock and score one half inch on each end. These will get adhered to the inside of the tool box to hold the tools. 

Cut two 3 1/4" x 1" peices of red cardstock and adhere to the front of the toolbox as drawers. 

Cut one 3 x 3 1/4" peice of designer paper (I actually used aluminum foil here) to make the back mat. 

Stamp, cut and decorate the the tools and greetings as desired and add to box. 

Voila, a perfect card for a handy Dad!